Prerequisites
- Create or import Entities on the Cloud environment, these will need to exist before migrating as they are mapped in the tool
The steps to import can be found here, but it’s important to do this together with someone of our Support Team if they want to import all entities at the same time to ensure that nothing gets created incorrectly.
Engagements will be automatically mapped to entities based on the Operating name/Entity name respectively. If they are not similar, this will need to be done manually. - It’s recommended to migrate the Engagements in groups of max 50 per upload.
You will select one folder in the tool, all Caseware files in this folder and all subfolders will be selected for upload so placing and grouping the WP Engagements on a separate local folder is recommended.
Issues can arise when trying to migrate from a server when the connection is slow. - Only Engagements with a standard fiscal year are possible for migration currently.
Extended fiscal years are not possible to upload through the tool, they will need to be created manually in the cloud.
In an update which will be released in March 2026 this will be possible. - To limit the amount of licenses used in the cloud it’s only necessary to migrate the latest engagement for one client, not necessary to upload old fiscal years (But it's still possible if needed)
- If you want access to the tool, please contact our Support Team at support@caseware.be
Connect to your Cloud Server
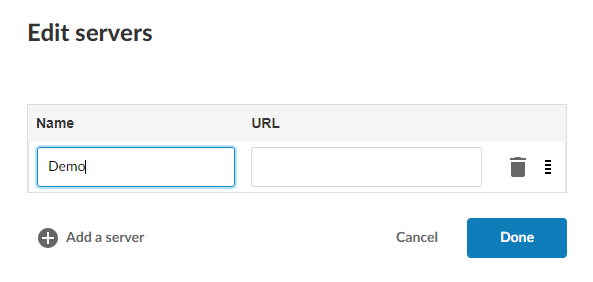
- Select Edit servers in the dropdown

- Fill in the following information:
- Name: the name you will give to this connection, this will make it easier to identify if you have multiple connections set up
- URL: your Caseware Cloud URL
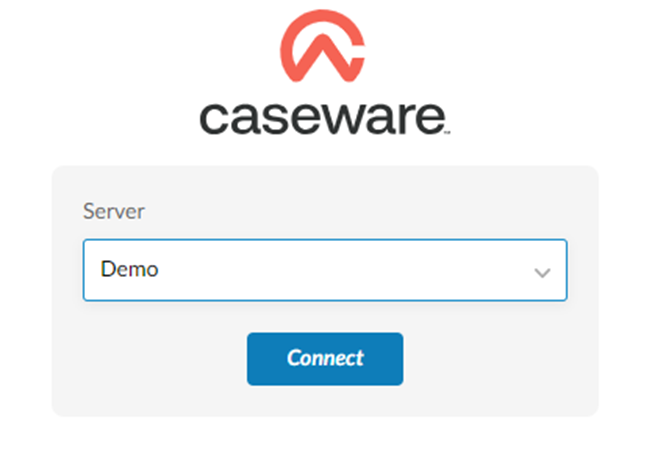
- After selecting the newly created server in the dropdown, you will be asked to log in
Dashboard
Here you will see an overview of all active and previous uploads
You can start a new upload by selecting New Upload

New upload
General
Enter the following information:
- Upload Name
- Target Application: The template you wish to upload to

Source File Settings

- File Location: The location of the folder containing at most 50 Engagements you wish to upload
- Year end date range: Only Engagements with Fiscal Years that fall between these dates will be uploaded. It is however recommended to separate the engagements in Folders as it is easier to make sure the limit is not exceeded
- Data Points: You can select what is uploaded and added to the newly created Engagement.
- Custom mapping file: This file will be provided to you together with the tool.
This will automatically map the Accounts
(Only has to be used when you receive this from Caseware) - External files: There are multiple options